PMP Course overview – Project Management

Hello All, In this series of blogs, I will focus on PMP course overview and will try to cover details on Project Management  Process Groups (5), Knowledge Areas (10) and Processes (49) based on 6th Edition of PMBOK (www.pmi.org).

Below is the list of Process groups

  1. Initiating
  2. Planning
  3. Executing
  4. Monitoring and controlling
  5. Closing

Below is the list of Knowledge Areas (I, S, S, C, Q, R, C, R, P, S)

  1. Integration management
  2. Scope management
  3. Schedule management
  4. Cost management
  5. Quality management
  6. Resource Management
  7. Communication Management
  8. Risk Management
  9. Procurement Management
  10. Stakeholder Management

In next blogs, will cover above knowledge areas with Role of Project Manager and Project Management framework.


Update List Items using PUT REST API: SharePoint

Earlier we discussed about Different RESTful APIs. Click here for the earlier article.

  • GET – Read Response, having details of requested resource.
  • POST – Create or Update Resource such as List of Libraries.
  • PUT – Update or Insert resource, body of the message specifies resource to be created.
  • PATCH – Partial update of resource.
  • DELETE – Removes resource from specific URL.

For example on POST method, click here.

In this article we shall focus on PUT method and understand with example on how to Update SharePoint List Item using PUT REST API. Here sample code is to update list title.

We shall need to understand key difference between PUT and POST as what we achieve is same, only the way they are used is different.

  • The PUT method completely replaces whatever currently exists at the target URL with something else.
  • PUT operation is idempotent which means, if PUT operation is repeated multiple times ( hit same URI multiple times ) for same set of values then it will produce the same result, state of resource would be same.
  • On the other hand, the POST method is not idempotent since if we send the same POST request multiple times, we will receive various results

Follow Below steps to use PUT method, please note, both examples are same for PUT and POST, only difference is the usage of the method.

  1. Add Script Editor Webpart to SharePoint Page.ScriptEditor
  2. Create List with title EmployeeList(Assume reader is aware how to create list in SharePoint)
  3. API Url will look like: http://SiteUrl/_api/web/lists/GetByTitle(‘EmployeeList ‘)/items/getbyid(1)
  4. Use the code given below(need to make sure you have created list name as given above, if not change list name accordingly based on which is present in site), I have attached screenshot, you may please drop email for code file if you need.Update_PUT_RESTAPI

Hope this helps, next we shall focus on PATCH method from REST API.

————————————–

for queries, suggestions, feedback contact on

email :bipinparshottam@gmail.com

skype: bipin.pankhania

Get List Items using REST API: SharePoint

Earlier we discussed about Different RESTful APIs. Click here for the earlier article.

  • GET – Read Response, having details of requested resource.
  • POST – Create or Update Resource such as List of Libraries.
  • PUT – Update or Insert resource, body of the message specifies resource to be created.
  • PATCH – Partial update of resource.
  • DELETE – Removes resource from specific URL.

In this article we shall focus on GET method and understand with example on how to retrieve data using REST API.

Follow Below steps:

  1. Add Script Editor Webpart to SharePoint Page.ScriptEditor
  2. Create List with title EmployeeList(Assume reader is aware how to create list in SharePoint)
  3. API Url will look like: http://site url/_api/web/lists/GetByTitle(‘EmployeeList’)
  4. Use the code given below(need to make sure you have created list name as given above, if not change list name accordingly based on which is present in site), I have attached screenshot, you may please drop email for code file if you need.GET_RestAPI

Hope this helps, next we shall focus on POST method from REST API.

————————————–

for queries, suggestions, feedback contact on

email :bipinparshottam@gmail.com

skype: bipin.pankhania

Understanding SharePoint REST Service

REST – Representational State Transfer, is comparable to existing SharePoint client object Model.

With REST now we can perform CRUD(Create, Read, Update and Delete) operations against Lists and Sites in SharePoint.

Below is the sample Architecture of SharePoint REST API.

REST_Arch
Example of RESTful Http request is given below based on Client object Model method.
Note, we need to prepare RESTFul services based on Client Object Model to perform operations similar to COM.

Client Object Model Method.
List.GetByTitle(listTitle)

REST Endpoint
http://server/site/_api/lists/getbytitle(‘listtitle ‘)

client.svc Web Service in SharePoint handles HTTP request and send response either in Atom or JavaScript Object Notation(JSON) format.

Below are the common HTTP methods used for RESTful APIs.

  • GET – Read Response, having details of requested resource.
  • POST – Create or Update Resource such as List of Libraries.
  • PUT – Update or Insert resource, body of the message specifies resource to be created.
  • PATCH – Partial update of resource.
  • DELETE – Removes resource from specific URL.

Next articles, we shall review examples.

————————————–

for queries, suggestions, feedback contact on

email :bipinparshottam@gmail.com

skype: bipin.pankhania

Fix Server Timeout issue while using SPQuery

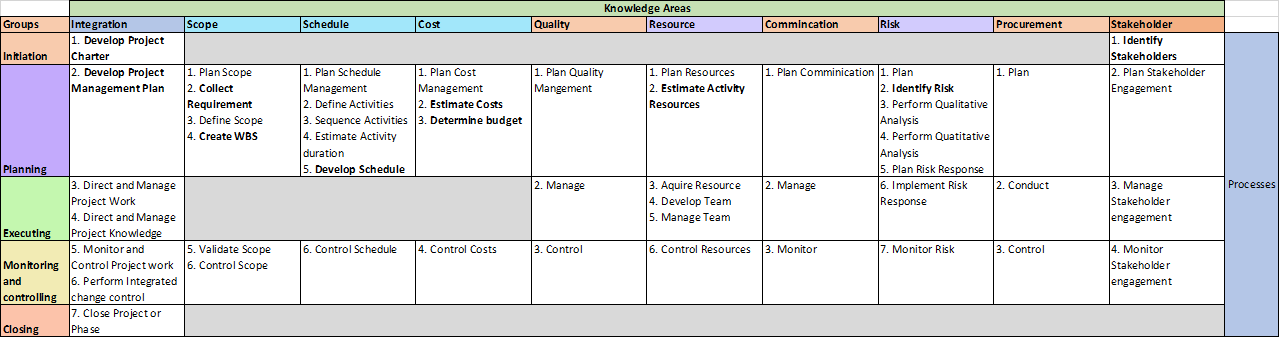
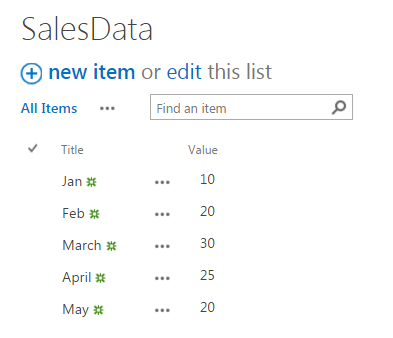
The ListItemCollectionPosition property is used together with the RowLimit property to define paging in a query(to fix server timeout issue while using SPQuery)

Specifically, the SPListItemCollectionPosition object is used to iterate through all the items in a collection n items at a time, where n is the value specified as a row limit.

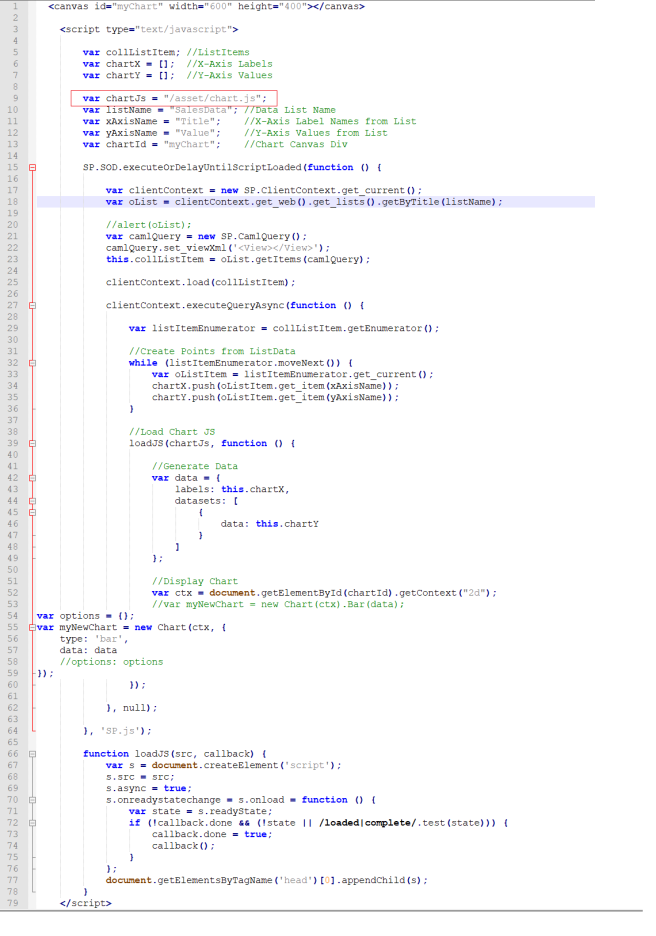
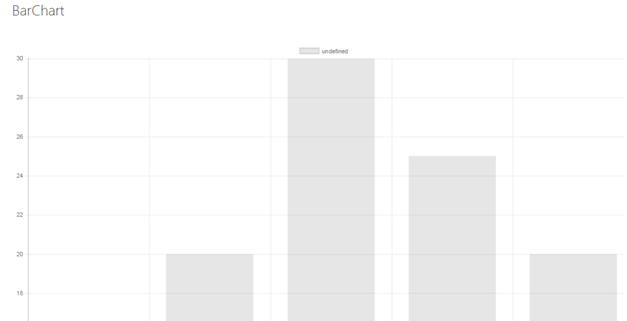
The following code example uses the ListItemCollectionPosition properties of the SPListItemCollection and SPQuery classes to return an SPListItemCollectionPosition object for storing where each page of data ends in the collection of items and displays the titles of items in groups of 10 rows.

The example assumes that the list is a document library or that folders are enabled in the list. The example also assumes that the list includes a field with the internal name “title” and a field with the internal name “field1”.

Code Sample:

using (SPWeb oWebsiteRoot = SPContext.Current.Site.RootWeb)
{
SPList oList = oWebsiteRoot.Lists[“Announcements”];// Assuming Site has the list.
SPQuery oQuery = new SPQuery();
oQuery.RowLimit = 10;
oQuery.Query = “<OrderBy Override=\”TRUE\”>” +
“<FieldRef Name=\”FileLeafRef\” /></OrderBy>”;

int index = 1;

do
{
Response.Write(“<BR>Page Index : ” + index + “<BR>”);
SPListItemCollection collListItems = oList.GetItems(oQuery);

foreach(SPListItem oListItem in collListItems)
{
Response.Write(SPEncode.HtmlEncode(oListItem[“title”]) + “<BR>”);
}
oQuery.ListItemCollectionPosition =
collListItems.ListItemCollectionPosition;

index ++;
} while(oQuery.ListItemCollectionPosition != null);
}

Data Paging is built into SharePoint’s SPQuery object. It’s a useful feature that you can use to retrieve batches of data instead of retrieving all items of a list.

Advantage: This would help fix issue with server time out while fetching larger amount of data from a List.

————————————–

for queries, suggestions, feedback contact on

email :bipinparshottam@gmail.com

skype: bipin.pankhania


Update page layout using Visual Studio Feature Receiver

If we have branding project with Page Layout and this project is deployed, now client asks for some changes in branding project page layout, in this case one can update page layout using SharePoint designer, this would be a manual approach, if there are multiple page layouts need update, one can do it using feature receiver.

Need to add a module file, need to add updated page layouts here, need to add feature receiver and write below code(Screenshot given, for code file, drop me email).

The Project would look as per below screenshot.

VSScreen

Below is the screenshot of Event Receiver code.

EventReceiver

Please note: Example is for VS2010, same can be achieved with Latest VS version.

————————————–

for queries, suggestions, feedback contact on

email :bipinparshottam@gmail.com

skype: bipin.pankhania

Create Bar chart in office 365

Here I have added Basic Bar chart, this is of rudimentary level, if you detailed level of chart, you may have to play with chartscript.js file accordingly.

Need to follow given steps, to display basic bar chart.

  • Upload the Chart.js to a Document Library
  • Create a SharePoint List that contains the Data you want to Chart.
  • Create a SharePoint Page to stick the Chart on.
  • Add a Script Editor control to the Page
  • Add the JavaScript code the create the Chart

Details of the above steps with screenshot.

  1. Upload Chart.js to document library, I have uploaded to Asset Library, screenshot is given below(Please drop me an email for chart.js as I am unable to embed, or download from the URL https://github.com/chartjs/Chart.js )AssetLibrary.png
  2. Create SharePoint List that maintains data you want to show in Chart(I have created SalesData List, screenshot is attached below.SalesData
  3. Add Script editor webpart to the page, where you want to display bar chart, Please refer screenshot(Under Pages Library, create page and add webpart, drop me email if need detail on how to create page in page library).ScriptEditor
  4. Edit webpart and paste “ChartScript” to display chart(Please note, here I am adding screenshot of the ChartScript as unable to paste JS code, please drop me email if need code.ChartScriptImage
  5. This would display bar chart as per below screenshot.BarChart
  6. Please note this is basic level of chart that I have configured, to have detailed level of chart, you may have to play with chartscript file(e.g. bar chart color, axis labels etc).

————————————–

for queries, suggestions, feedback or for the code contact me on

email :bipinparshottam@gmail.com

skype: bipin.pankhania

Configure and Organize documents in SharePoint – 4

There are 4 different ways to configure and manage document library.

  • Folders
  • Metadata
  • Content Type
  • Document Set

Part 4 will focus on Document Set Pros and Cons.

Each Document Set “page” serves as a mini-site that contains some basic information + documents themselves.

Document Sets are best for

  • Organizations/teams that run lots of mini-projects
  • Teams that need to ease their users who are too attached to folders into metadata concept
  • Situations where unique security/permission are required for each “folder” (document set)

Pros

  • Ability to set unique permissions for different document sets (folders)
  • Organizes documents in a presentable fashion
  • Allows for “light” project management without overhead of creating multiple sites/libraries
  • Allows for quite extensive filtering, grouping, sorting of documents based on their properties

Cons

  • Requires setup before documents are uploaded to SharePoint Document Library
  • Overall library size might be a concern (i.e.. 5,000 items view threshold limit) as all document sets/folders physically sit in same SharePoint Document Library
  • Best for mini-projects. No ability to add additional Project Management web parts to the mini project site (document set). If additional Project management capability is required – provisioning separate project sites is recommended.

————————————–

for queries, suggestions, feedback contact me on

email :bipinparshottam@gmail.com

skype: bipin.pankhania

Configure and Organize documents in SharePoint – 3

There are 4 different ways to configure and manage document library.

  • Folders
  • Metadata
  • Content Type
  • Document Set

Part 3 will focus on Content Type Pros and Cons.

Content Type allows to create categories (types of content) for a single (bold) SharePoint document library. So if you are uploading invoices, it will prompt you to tag against Client Names. If you are uploading meeting minutes – it will ask you to tag with a particular meeting date. For each content type (read: type of content) – you can specify which columns of metadata would apply.

ContentType

Content Types are best for

  • Situations where there is a mix of different document types that need to be stored
  • in a single SharePoint Document Library
  • Teams that required standardization of their documentation
  • Teams that need ability to easily find documents
  • Anytime time where you have lots of people uploading and accessing the files
  • Larger teams
  • Teams that have high turn-over (i.e. non-profits, volunteers)

Pros:

  • Allows to store different types of documents in a single SharePoint document library
  • Organizes documents in a presentable fashion
  • Allows for filtering, grouping, sorting of documents based on their properties
    Improves User Adoption of SharePoint
  • Excellent way for newbies to find the right documents
  • Reduces overhead with creation and maintenance of additional document libraries/sites

Cons:

  • Requires even greater setup before documents are uploaded to SharePoint Document Library
  • No out of the box ability to set permissions based on metadata or content type (the whole SharePoint Document library will have same permissions)
  • “Open with Windows Explorer” and “Sync to desktop” no longer makes sense as there are no folders (all files seat in 1 flat library/folder)